Beginner Resources
Better Comments on VsCode

How to write better comments in VsCode
Install the Better Comments extension.
Format Code with Ruff , a linter for Python.
When you press Command + S, it formats the code automatically.
| Commands | What it does? | Where? |
|---|---|---|
ruff check fileName.py |
Linter: Checks errors and suggests fixes. | In the current directory |
ruff check path/to/file/file.py |
Set the path |
Managing Multiple Python Versions with PyEnv
Usually we could use multiple versions for many reasons:
- Lets you change the global Python version on a per-user basis.
- Provides support for per-project Python versions.
- Allows you to override the Python version with an environment variable.
PyEnv
| Function | Command |
|---|---|
| Install a specific version of python | pyenv install "3.10." |
| Set global version | pyenv global "version" |
| Install a local version inside a directory | pyenv local "version" |
| List all the versions | pyenv install -l |
Python Virtual Environment
A virtual environment is a self-contained location that enables to maintain a separated and isolated environment for my Python Projects.
Advantages:
- Manage Dependencies
- Versions
- Packages
- Libraries
- Each project can have a set of independent packages.
Environment Management:
| Functionality | Where | Commands |
|---|---|---|
| Create venv (virtual environment) | Project Folder | python -m venv envName |
| Activate the virtual environment | Project Folder | source envName/bin/activate |
| Deactivate | Project Folder | deactivate |
| Remove virtual env folder | Project folder | rm -r envName |
Package Management
What is a Package?
A package contains all the files you need for a module.
Modules are Python code libraries you can include in your project.
PIP is the core instrument to install libraries.
- When you have libraries in your project and they are pushed in a server, in order for other people to use your app/code/whatever , they need to install the necessary libraries as well.
- So you create a requirement.txt file and a main.py file.
Usually there should be a requirement.txt file that contains all the dependencies/libraries, so they can be installed in one go.
! 90
This way to define the package version is called Pinning
| Functionality | Where in Terminal | Commands |
|---|---|---|
| Check pip version | Project folder path (pfp) | pip -V |
| Install a package | pfp | pip install packageName |
| Uninstall a package | pfp | pip uninstall packageName |
| List all packages | Project folder / Desktop | pip list |
| Install packages from the 'requirements.txt' file. (-r means install from a file) | pfp | pip install -r requirements.txt |
| Save packages in requirement file (Save packages and their versions in the file) | pfp | pip freeze > requirements.txt |
| Save all packages in the requirement file with their versions pinned. | pfp | pip freeze > requirements.lock |
What if the libraries you are using in your project get updated or patched?
- Modify requirement.txt like this to get the latest version
! 150
When we save this, this is called lock files
Semantic of versions
! 150
Now can update again your requirement.txt file
! 200
UV
Another package manager for Python, way faster!!
To install it, use pip install uv (Only above Python 3.7)
List of Commands:
| UV commands | Shows in the terminal | Code | |
|---|---|---|---|
| uv python list | List all the available python version | uv python list |
|
uv python install version |
Install a specific version of Python in your project folder (local) | ||
uv python uninstall version |
Uninstall the specific version | ||
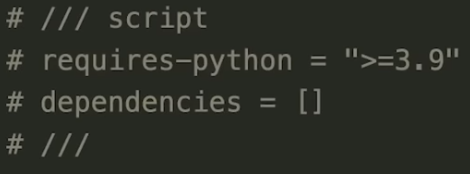
| uv init | Create a new project environment | `uv init' | ! 100 |
| uv init | Create a new project, with a specific file and Python version | uv init --script main.py --python 3.9 |
 |
uv run file name |
run your python file | ||
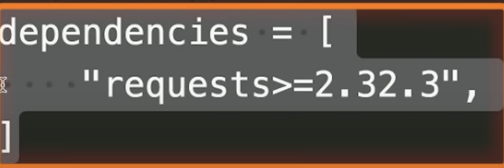
uv add package |
Install a package | uv add requests or they can be added manually to the dependencies list |
 |
uv remove package |
Uninstall a package | ||
| uv sync | Update the venv (Virtual Environment) | ||
| uv lock | Generates the lock file | ||
| When you use uv than pip : |
- Your project won't have the requirements.txt file
- Dependencies will be stored in pyproject.toml file
- UV synchronizes the UV sync file to pyproject.toml file
Basic Git commands workflow:
Git saves our files in between these locations :
- Local Machine (Working Directory)
- Here we actively edit files locally (Our Playground :)
- Staging area : A temporary spot where files are held before comitting
- Local repository : Stores committed files locally
- Remote Repository : Github Server
! 300
Steps to set your repo locally (You should have a project folder)
- On terminal , the directory you are in should be your project
| Command | What it does? | Advantages |
|---|---|---|
git init |
Initialize local repository | You can keep different versions of your project |
git add . |
Add the working directory to the staging area | The staging area stores information about what we are going to commit. The period . adds all the files |
git status |
Shows what changes are in the staging area | |
git commit |
Commit the files | Whenever committing a file, it is important to include a message describing what has changed. -m is the keyword that adds a message. git commit -m "Initial Commit" |
git log |
Shows the story of the local repo |
Steps to set your repo remotely
- On terminal , the directory should be your project
| Command | What it does? | Description |
|---|---|---|
git remote add origin git@github.com:YOURGITHUB/YOUR-REPOSITORY.git |
This connects to the remote repository on Github | Where there is a repo in the local workstation, you can create a repository on Github and add the local repo to that. |
| git remote -v | Shows versions | Shows the current local repo. version |
git remote rm origin |
Remove the origin | |
git push -u origin mastergit push -u origin main |
Push the local repo to the remote one | -u set a new upstream, which configures the local branch (origin master) to track the remote branch. This has to be done only ONCE when pushing for the first time the master branch. |
git branch "newBranch" |
Creates a new branch of the master code. A branch in Git is a way to work on a draft copy of the main source code without committing every time to the original code. | |
git branch |
This will show all the branches | * An asterisk will appear, which shows which branch you are in. |
git switch "newBranch" |
This switches from the master to another branch | When |
git status |
Check if any change was made | |
git add "filename" |
Add the file you have modified, it will be shown on the status | This is added to the branch you are in. |
git commit -m "newChange" |
Add the modified file to the repository (master or another branch) | |
git push -u origin newBranch |
Push the new branch to the remote repo | Using upstream -u again as this is a new branch |
Merge branches : Pull request and delete
When everyone working on a project has agreed and reviewed the code, the mebers can merge pull request to merge the newBranch to the master branch.
git fetch + git merge = git pull
| Command | What does it do: |
|---|---|
git pull origin master |
It fetches the changes, and merges the branches together. |
git log |
Shows the history of all the changes, commit, and etc |
git revert ["logNumber"] |
When you put the log number from the git log, it reverts to the version of the code at we want to be back to. (Inside local repository) |
git reset --hard "gitHashNumber" |
This hard resets to a specific point of the version. (Inside local repository) |
git push --force origin master |
This will push the hard reset done in the previous step to the remote repository |
How to structure projects:
Step 1 - Start from your Goal. Ask yourself: Why the project? Who is it for? What will make it valuable?
Step 2 - Write user stories. User-centric design. List the basic functions the end user should be able to do. (Upload a file, create an account, build a dashboard, etc.)
Step 3 - Define your data models. What information will you store? How will it relate to other data? What do those relationships look like?
Step 4 - Nail an MVP (minimum viable product). A critical review of all user stories and features listed, and ask yourself: Do I absolutely need this function for my app to work? If not, remove it from your list. The MVP forces you to focus on what actually matters, what gets you to a working prototype fast, and what will not overwhelm you.
Step 5 - Draw a stupid simple prototype or very basic wireframe of your application. Use a pad and pencil to create a basic page layout to draw the needed functions (where does the login form go?, What happens after a file upload completes?, How do I navigate between pages?, etc.)
Step 6 - Understand what the future of your project is going to look like. Determine what type of project it will be in six months: Will it still be a simple hobby, or one that will need to be able to scale up for many users?
Step 7 - Drill into the components. Questions to ask yourself: Will it be just a simple script, or will it require a back-end API and a front-end interface? Will it be a browser extension? A mobile app? A web service? What is the architecture of the project? Think about how users are going to interact with your application, and what technical components you will require to make it work.
Step 8 - Picking your stack. A stack is just a set of tools that help you create a project. Begin first with the project idea, then decide what tools are available to solve the problem or create the project, then pick the best one for the project. A general rule: Pick the simplest stack, that fits within your relative skill-set, that you can accomplish your goals with. After picking a stack, a question to ask yourself: Can I deploy this?
Step 9 - Overall development process. This step is where coding begins. Create a project skeleton: -basic folder structure. -development environment. -version control. Setting up the database and creating data models. Build the back-end routes: -API endpoints. Front-end interface. -Connect to back-end. Project iteration.
Visual Studio
Often IDE support different coding languages, but these are not built-in.
There is a protocol called Language Server that provided language-specific support.
What Language Servers enable?
- Code completion
- Provide definition of different struct (Semantic definition)